Emoncms
Setup Emoncms
Emoncms is an open-source system that stores time-series data and has multiple reporting apps developed by the authors as well as apps contributed by users in the open community. The graph application used locally by IoTaWatt is a derivitive of that effort.
For a nominal fee you can use the managed enterprise version of Emoncms at Emoncms.org or you can install the software on your own machine, including a RPi, and run a local instance for free.
Configuring an IoTaWatt to upload to Emoncms is easy. First, go to Emoncms.org and establish an account, or install the software on your server and setup an account. There is a nominal fee to use Emoncms.org that should amount to a few dollars per month for a typical IoTaWatt user.
Configure IoTaWatt
After establishing an account, run the IoTaWatt
configuration application, hover over  and click
 from the dropdown menu.
Choose Emoncms.
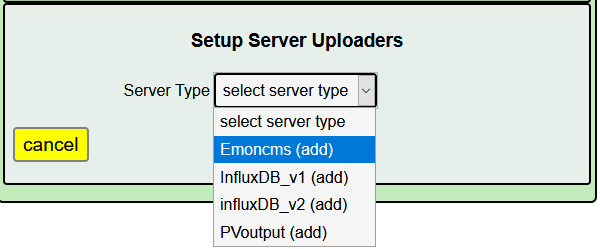
Here you will specify the URL to use for emoncms, your credentials and what data to upload.

- Node
Grouping that you want to assign to all data upload from this IoTaWatt to distinguish it from data uploaded from any other devices that you may have. It is somewhat arbitrary and defaults to the name of your IoTaWatt device.
- post interval
Number of seconds that each data point will represent. The tradeoff is between higher resolution (small interval) and minimizing the storage requirement of the data over time (larger interval). IoTaWatt accepts any value from 5 seconds to 3600 seconds (1 hour), in 5 second increments. Because of the way Emoncms reports, it’s best to use a number that is an even factor or multiple of one minute: 5, 10, 15, 20, 30, 60, 120, etc.
- bulk send
Number of interval postings to aggregate into a single posting request. Specifying 1 will send a data packet to Emoncms at each interval. If your interval is 5 or 10, it will send a packet every 5 or 10 seconds. That’s fairly inefficient and can be problematic when there are internet connectivity issues. By specifying a larger bulk send, IoTaWatt will aggregate the posting data for that many intervals and send the data in one packet. For instance if your interval is 10 seconds, specifying bulk send = 3 will cause data to be sent every 30 seconds. Large bulk send values will cause any real-time dashboards in Emoncms to update less frequently, so you should strike a balance. IoTaWatt keeps all of the data in local storage, so there is no risk of losing data by using this feature. Should there be any failure to deliver, IoTaWatt will pick up with the last successful posting when the problem resolves itself.
- upload history from
When starting a new Emoncms node, you can specify a date from which to upload historical data. To the extent that the data is available in the local datalog, IoTaWatt will bulk upload the historical data to Emoncms. The bulk upload can take anywhere from several minutes to a day or more depending on the time-frame and the upload speed. Regardless, the historical upload is done in the background and will not significantly affect normal operation.
- server URL
URL of the Emoncms server. This field defaults to the Emoncms.org server. The software is open, so you may maintain your own server (software on GitHub) or you may get one of the OpenEnergyMonitor.org products that run a version of the software on a raspberry-pi. When using a local instance of Emoncms, you can use the IP format with optional port number. An example might be http://192.168.0.112:80/emoncms.
If you have setup a HTTPSproxy server, you can use the HTTPS:// method here for secure uploads. There is also a
- api key
A 32 character hexadecimal key to authorize posting to an account. Once you establish your account, locate the read-write api key and copy/paste into this field.
- Emoncms userid
By specifying this optional value, you instruct IoTaWatt to use a secure encrypted protocol to send data to Emoncms. There is no downside to doing this, and it is recommended. Your userid is a four or five digit number located in the “My Account” section of the Emoncms.org site.
Now click  and IoTaWatt should begin sending data to
your Emoncms account. You can see the status of the
Emoncms service in the Status Display
and IoTaWatt should begin sending data to
your Emoncms account. You can see the status of the
Emoncms service in the Status Display
IoTaWatt uploads the current voltage or power corresponding to all of the input channels in each post. You can configure Emoncms (follow their instructions on the website) to save only what you want to keep in “feeds”. Setting up and configuring the Emoncms account is documented on the Emoncms.org site.
Customizing Input data
You can customize the data that is sent to Emoncms using the Emoncms Inputs list at the bottom of the configuration screen. This list is very similar to the Configure Outputs section, except rather than calculate named values that can be viewed in the status screen or displayed in the graph application, you specify how to calculate the individual inputs to Emoncms using the same calculator interface.
Initially, these fields correspond to each of the IoTaWatt inputs. By editing this list, you can change the values that are sent, delete specific values, or add additional computed values to be sent.
One distinctive feature of this list vs the outputs list is that the names must be numeric values between 1 and 99. The name of an entry corresponds to the Emoncms input “key” value. When editing the various fields, if you add a new entry with the same number as an existing entry, or change an entry to the same number as an existing entry, it will replace the existing entry. Each time you save an entry, the list will be reordered.