HTTPS Proxy Server
Like many IoT devices, IoTaWatt does not have the resources to communicate over the internet using secure TLS. While the local LAN can be relatively secure, data uploaded to internet based servers is transmitted in plaintext and vulnerable. One exception is the Emoncms web service where a protocol to authenticate and encrypt communications is available.
Some external services, such as influxCloud, require TLS (HTTPS) be used in all communications. IoTaWatt can use a simple proxy server on the local LAN to overcome this limitation and forward internet communications using HTTPS.
NGINX (engine-x) is an open-source web-server that can be hosted on a variety of inexpensive processors. The ubiquitous RaspberryPi being a simple and inexpensive favorite. Once setup, you only need to set the URL of the proxy server into IoTaWatt, and it will be used to communicate with any uploader where the URL of the service is specified as HTTPS:// method.
Setup up NGINX on a RPi
Rather than reinvent the wheel, this section will lean heavily on existing webtutorials to setup a RPi based NGINX proxy. Many will already have an RPi or other Linux based resource on their LAN and can host NGINX there.
An RPi 3 Model B or better is recommended. With a case, SDcard and power supply the cost is usually less than $50 US. There are many tutorials for setting up the Basic RPi with the latest software release. Rather than post a link that may get stale, I’ll leave it to the reader to search the internet for one that suits their capabilities.
Once the basic system is up and running, it’s easy to add NGINX. Simply follow this tutorial from the RaspberryPi folks.
Add the HTTPSproxy location
Whether you decided to setup a RPi with NGINX or you installed NGINX on another platform, all that is left is to add the Location configuration for the HTTPS proxy.
Download the HTTPSproxy location from the IoTaWatt server to the NGINX configuration using the command:
sudo wget -P /etc/nginx/sites-enabled https://iotawatt.com/download/HTTPSproxy
Then reload the NGINX configuration using the command:
sudo nginx -s reload
Configure the proxy in IoTaWatt
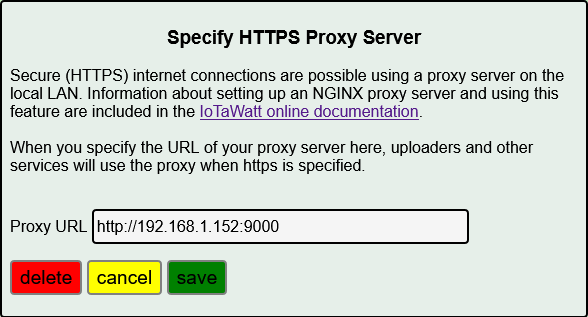
Using a fixed IP address for the NGINX host, setup it’s address in IoTaWatt.
Select  then
then  from the dropdown.
Add the URL with port :9000 and press
from the dropdown.
Add the URL with port :9000 and press  .
.